Click here for the English Version

Hallo!

Nun ist der Sommer mit seiner Hitzewelle auch in Österreich eingetroffen. Deswegen muss etwas Kaltes her und was wäre besser als ein selbstgemachtes Eis. Es ist das erste Mal, dass ich ein Kokoseis selbst gemacht habe. Bis jetzt waren alle Eissorten immer auf Basis mehrer gefrorener Bananen. Ich kann dir aber versichern, es schmeckt unglaublich lecker.

Es ist so einfach zu machen und du brauchst nur 4 Zutaten. Du kannst dein Kokoseis am Schluss auch noch mit gehackter Schokolade verfeinern, dann bekommst du ein Eis, dass nach Bounties schmeckt – ein Hammer!

Das Rezept ist vegan, paleo und frei von künstlichem Zucker. Anstatt dem Ahornsirup kannst du auch Honig verwenden – dann ist dein Eis zwar nicht mehr vegan, aber es schmeckt trotzdem super lecker. Viel Spaß beim Ausprobieren und beim Naschen.

Deine Anna ❤️


Zutaten

2 Dosen Kokosmilch (Vollfett)
70g Kokosraspeln
Mark einer Vanilleschote
100g Ahornsirup (oder etwas mehr für alle die es Süßer wollen)

Zubereitung

  • Stelle die Kokosmilch über Nacht in den Kühlschrank.
  • Am nächsten Tag gibst du alle Zutaten in einen Mixer und mixt es kurz, bis sich die Zutaten gut miteinander verbunden haben.
  • Fülle dein Kokoseis in einen gefrierfesten Behälter und stelle ihn für ca. 6 Stunden in den Gefrierschrank. Rühre dein Eis jede Stunde um. Je öfter du es umrührst, desto cremiger wird dein Eis.
  • Genieße dein selbstgemachtes Eis mit frischen Früchten.
  • Guten Appetit!

English:

Coconut Ice Cream

Homemade ice cream – what can be better. It´s so simple and all you need are four ingredients. It´s the first time, that I made coconut ice cream by myself. So far, I only made ice cream with frozen bananas and other frozen goodies. But I can tell you, this coconut ice cream tastes so good.

The ice cream is vegan, paleo and refined sugar free. Instead of the maple syrup you can use honey as well. If you use honey your ice cream is no longer vegan. You can also top your coconut ice cream with chopped chocolate, then you get a bounty ice cream. Try it out and tell me if you like it as much as I do.

Yours Anna ❤️


Ingredients

2 cans coconut milk (full fat)
70g shredded coconut
pulp of one vanilla bean
100g maple syrup

Instructions

  • Put your coconut milk in the fridge overnight.
  • The next morning place all ingredients in a blender and blend it until well combined.
  • Freeze coconut ice cream for about 6 hours. Stir the ice cream with a spoon or a fork every hour. The more often you stir, the better the ice cream will be.
  • Enjoy your selfmade ice cream with fresh fruits.

Click here for the English Version

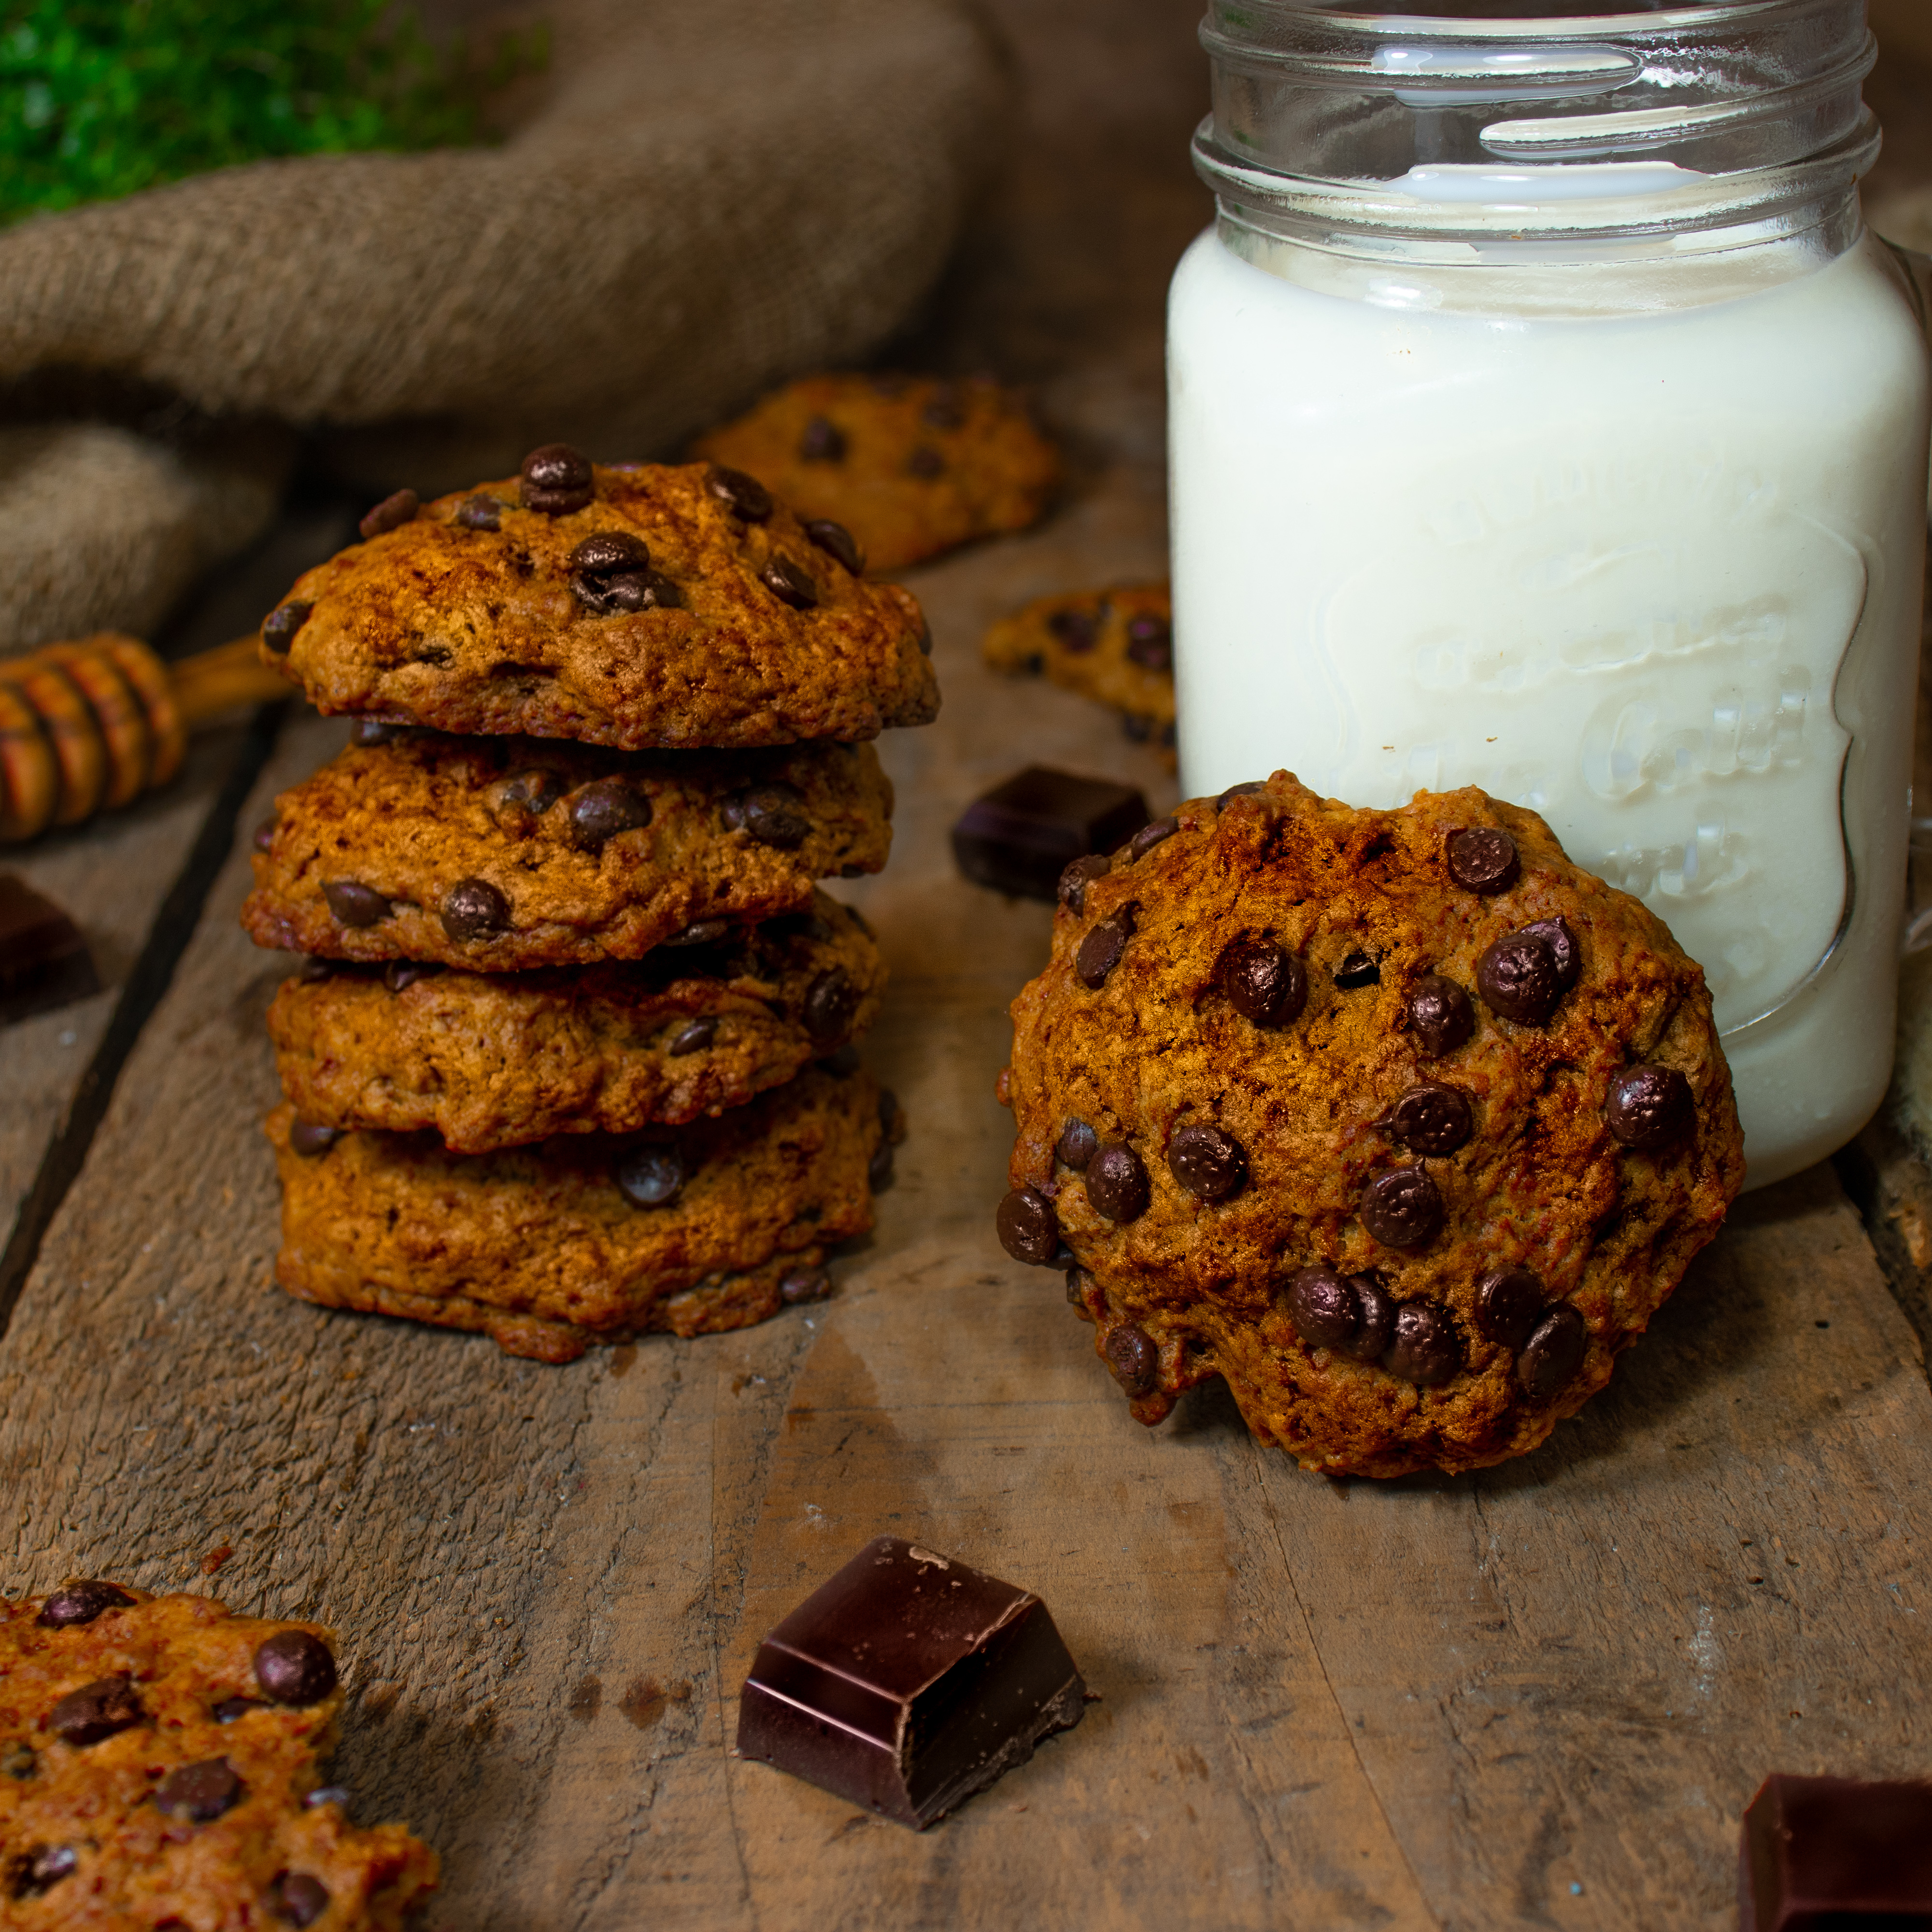
Wer liebt Schoko-Cookies nicht? Ich finde, Schoko-Cookies kann man immer essen, egal zu welcher Tageszeit. Mit diesem Cookies-Rezept zauberst du in insgesamt 20 Minuten unglaublich leckere, saftige Kekse auf den Teller. Bei mir halten sie nicht einmal einen Tag, da sie immer sofort aufgegessen werden. Ich wünsche dir viel Spaß beim Backen.

Deine Anna 😘


Zutaten für 10 große Cookies

1 cup Schokotröpfchen
1/2 cup Kokosblütenzucker
1/4 cup Kokosöl*
1/4 cup Mandelmilch
2 EL Apfelmus
1 ¼ cup Mehl
1 TL Natron
etwas Vanille

Zubereitung

  • Heize den Backofen auf 180°C vor und belege ein Backblech mit Backpapier.
  • Mische in einer Schüssel dein Kokosöl mit dem Kokosblütenzucker und der Vanille.
  • Füge deine Mandelmilch und das Apfelmus hinzu.
  • Danach mische das Mehl und das Natron unter und rühre bis du einen glatten Teig erhältst. Der Teig soll nicht flüssig sein.
  • Nun hebe die Schokotröpfchen darunter und portioniere mit einem EL deine Kekse auf dem vorbereiteten Backblech.
  • Backe die Kekse für ca. 12-15 Min bis sie goldig braun sind. Lasse die Kekse auskühlen, bevor du sie verspeist.
  • Genieße deine leckeren Kekse!

Notiz

*Wichtig ist, dass das Kokosöl fest ist und nicht geschmolzen, da die Cookies ansonsten nicht zerlaufen. Sollte dein Kokosöl zu flüssig sein, stell es entweder kurz in den Kühlschrank oder drücke sie vor dem Backen schon flach.


English:

Chocolate Cookies

Ingredients

1 cup chocolate chips
1/2 cup coconut sugar
1/4 cup coconut oil*
1/4 cup almond milk
2 Tbsp apple puree
1 and 1/4 cup flour
1 Tsp baking soda
a dash vanilla

Instructions

  • Preheat your oven to 180°C and line a baking tray with baking sheet.
  • Mix togheter coconut oil, coconut sugar and vanilla and stir until well combined.
  • Add almond milk and apple puree, stir well.
  • Add flour and baking soda and mix until you get a smooth and thick dough.
  • Fold in your chocolate chips. Dip your cookies with a spoon on the prepared baking tray.
  • Bake for about 12-15 min until your cookies are golden brown. Let them cool before eating.
  • Enjoy it!

Note

*It´s really important that your coconut oil is in a solid form. If your coconut oil isn´t solid place it for a few minutes in the fridge or use melted coconut oil and press cookies flat before baking them.

Click here for the English Version
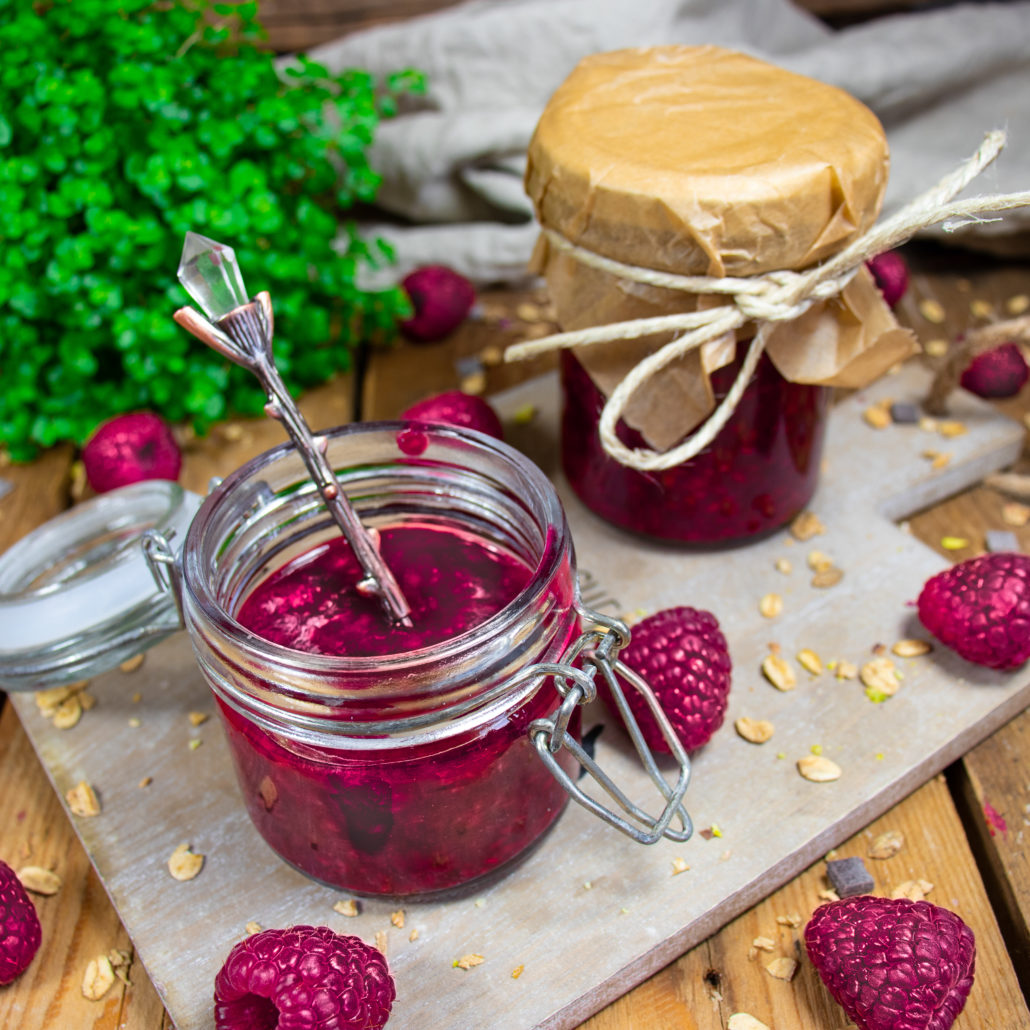
Super fruchtige, leckere und schnelle Himbeersauce – sie schmeckt so lecker. Und das Beste daran ist, du kannst sie mit allen möglichen Sorten von Beeren zubereiten. Ich bin ein großer Fan von Himbeeren oder Blaubeeren, aber auch mit gemischten Beeren wird sie richtig lecker. Die Sauce ist so unglaublich vielseitig einsetzbar und hält im Kühlschrank eine ganze Woche. Und seien wir uns ehrlich, selbstgemacht schmeckt doch immer am besten.


Zutaten für ein Glas á 250 ml

250g tiefgekühlte Himbeeren
2 EL Ahornsirup
Saft einer halben Zitrone
1 TL Vanille
1 TL Stärke

Zubereitung

  • Bringe in einem Topf die tiefgekühlten Beeren mit dem Zitronensaft und Ahornsirup zum köcheln.
  • Sobald es köchelt, drehe die Temperatur zurück und lasse es für 5-10 Min. weiter köcheln.
  • Rühre währenddessen deine Stärke mit 1 EL Wasser an.
  • Füge die Vanille und Stärke hinzu.
  • Sobald die gewünschte Konsistenz der Himbeersauce erreicht ist, fülle die Sauce in ein sauberes Einmachglas.

Passt perfekt zu Smoothiebowls, Chiapudding, Milchreis, Brotaufstrich oder einfach so zum Löffeln.

  • Guten Appetit  😘😘


English:

Raspberry Sauce

Homemade raspberry sauce – tastes incredible good. It´s so easy to make. You can choose all kind of berries you want. I´m a big fan of using either raspberries or blueberries for this sauce. But also mixed berries taste great. Serve it with pancakes, waffles, toasts, chia puddings … It´s so versatile. I love to eat this sauce to pancakes, oatmeal and quark dumplings.


Ingredients

250g frozen raspberries
2 Tbsp maple syrup
juice of a half lemon
1 Tsp vanilla
1 Tsp starch

Instructions

  • In a saucepan bring berries and lemon juice + maple syrup to a boil, then reduce to a simmer.
  • Let it simmer for 5-10 min.
  • In a bowl mix starch with 1 Tbsp of water.
  • Mash your berries with a fork and add vanilla and starch.
  • When sauce reach the desired consistency turn heat off and fill it into a clean jar.
  • Enjoy!

Click here for the English Version
Hallo!

Kannst du dir was besseres vorstellen, als knusprige, saftige, vegane Waffeln? Ich auch nicht ☺
Da ja am Sonntag Muttertag ist und viele Muttis zum Brunchen eingeladen werden, habe ich mir gedacht, ich zeige dir eine leckere Brunch-Idee die deine Mutti mit Sicherheit lieben wird.  Ich meine wer mag keine leckere Waffeln aus Mandelmehl und Dinkelmehl?! 🙈  Das Dinkelmehl kann man bedenkenlos durch glutenfreies Hafermehl ersetzen, falls du mit Gluten Probleme hast. Wenn habe meine Waffeln noch mit einem Löffel Eiweißpulver verfeinert und ja die Waffeln wurden einfach soooooo lecker. Serviert mit vielen frischen Früchten, Ahornsirup und Sekt steht eigentlich einem perfekten Brunch nichts mehr im Wege.

Ich wünsche dir viel Spaß beim Ausprobieren. Bitte teile mir doch mit, ob sie dir geschmeckt haben.

Deine Anna ❤


Zutaten für 4 Personen (8 belgische Waffeln)

160g Mandelmehl
140g Dinkelmehl oder glutenfreies Hafermehl (falls nötig)
2 EL Leinsamen gemahlen
550ml Milch nach Wahl (ich habe Mandelmilch verwendet)
2 EL Zimt
2 EL Backpulver
Vanille Flavordrops oder 3 EL Ahornsirup
25g Vanilleprotein-Pulver (optional)

etwas Öl zum Bestreichen

Toppings nach Belieben

z.b. Früchte, Granola, Ahornsirup, Joghurt

Zubereitung

  • Vermische alle deine Zutaten, bis auf das Öl und die Toppings, miteinander und rühre bis ein zähflüssiger Teig entsteht.
  • Lasse den Teig für 10 Min. ziehen.
  • Währenddessen heize dein Waffeleisen vor und bestreiche es mit ein wenig Öl.
  • Gib in jede Waffelform soviel Teig, dass sie ganz bedeckt ist und backe sie bis sie goldig braun und knusprig sind. Abhängig vom Waffeleisen dauert dieser Schritt etwas länger oder kürzer. Bei mir haben die Waffeln ca. 3 Min. gebacken.
  • Wiederhole den letzten Schritt bis dein Teig aufgebraucht ist.
  • Serviere deine Waffeln mit Toppings deiner Wahl wie zum Bsp. frischen Früchten, Ahornsirup etc.
  • Lass sie dir schmecken!


English:

Moist vegan Waffles

Hello!

Can you imagine anything better as crispy, moist vegan waffles? I couldn´t ☺
Motherday is on sunday and so I wanted to share a great brunch idea for you and your mum. I think everybody loves waffles, or not? 🙈  The waffles are made with almond flour and spelt flour, but if you have a gluten intolerance you can sub the spelt flour for gluten free oatflour. It works great too. I added a scoop protein powder to my waffles and they was incredible tasty. Serve it with fresh fruits, maple syrup and sparkling wine and enjoy your brunch.

Let me know if you like it.

Yours, Anna ❤


Ingredients for 4 Persons (8 belgium waffles)

2 cups almond flour
1,5 cup spelt flour or gf oat flour (if needed)
1 scoop vanilla protein powder (optional)
2 Tbsp ground flaxseeds
3 cups milk of choice (I used almond milk)
2 Tbsp cinnamon
2 Tbsp baking powder
Vanilla Flavordrops or 3 Tbsp maple syrup

Oil for greasing

Toppings of choice

Fruits, Maple syrup, yoghurt, granola e.g.

Instructions

  • In a mixing bowl mix all your waffle ingredients until you get a smooth, thicky batter.
  • Let the batter sit for about 10 Min.
  • Meanwhile heat your waffle iron and grease it with a little bit of oil.
  • If your waffle iron is ready pour in the batter and bake until your waffles are golden brown and crispy. My waffles needed 3 min to get crispy.
  • Repeat the last step until your batter is used up.
  • Serve with toppings of choice like fruits, maple syrup e.g.
  • Enjoy!

Click here for the English Version

Hallo!

Kennst du das auch, du kochst etwas und du brauchst dazu einer leckere Beilage, aber es soll mal etwas ausgefallener sein als normale Kartoffeln, Reis etc.? Dann habe ich hier genau das passende für dich! Nämlich leckere Fächerkartoffeln.

Fächerkartoffeln auch „Hasselback Potatoes“ genannt, sind super einfach und ich finde, auch ein echter Eye-Catcher. Du schiebst sie einfach in den Ofen und kannst währenddessen dein Hauptgericht zubereiten. Sie sind super lecker und je nach Backzeit zart schmelzend oder ultra crispy. Alles was du dafür brauchst, sind nur 5 Zutaten, wobei auch der Kurkuma rein optional ist. Ich verwende ihn aber gerne, da er super gesund ist.

Wenn du sie gemacht hast, würde ich mich über einen Kommentar von dir freuen, damit ich weiß, ob sie dir geschmeckt haben. So genug von mir. Jetzt kommt das Rezept.


Zutaten für 4 Personen

1 kg kleine Kartoffeln
3 EL Olivenöl
1 TL Kurkuma
1 TL Paprikapulver
1/2 TL Knoblauch-Salz (alternativ kannst du auch eine Knoblauchzehe schälen und pressen und einen halben Teelöffel normales Salz verwenden)
Rosmarin (optional)

Zubereitung

  • Heize deinen Ofen auf 200°C vor und belege ein Backblech mit Backpapier.
  • Wasche deine Kartoffel und schneide sie in Fächer. Pass dabei auf, dass du sie nicht komplett durchtrennst.
  • Mische in einer Schüssel das Olivenöl, den Kurkuma, das Paprikapulver und das Knoblauchsalz zusammen und bepinsle deine Kartoffeln außen, sowie die einzelnen Fächer.
  • Gib die Kartoffeln auf dein Backblech und backe sie für 30-40 Min. je nachdem wie knusprig du sie magst.
  • Belege sie 10 Min. vor Ende der Backzeit mit Rosmarin.
  • Lass sie dir schmecken!


English:

Hasselback Potatoes

Hello my friend!

I often have the problem, that I cook something and I don´t know what to make as side dish. I don´t want to make allways just normal potatoes, rice, etc. Do you know this problem? If yes, I have the perfect dish for you!

Haselback Potatoes are super easy to make and a real eye-catcher. You just put them into the oven and make your main dish in the mean time. I love them, because they are super tasty and depending on your baking time super crispy or really tender. You only need 5 ingredients. If you don´t have curcuma by hand omit it. I only use it, because it´s so healthy.

Please let me know in the comments, if you like it.


Ingredients for 4 Persons

1 kg (2 lbs) small potatoes
3 Tbsp olive oil
1 Tsp paprika powder
1 Tsp curcuma
1/2 Tsp garlic salt (you can also use 1 minced garlic glove + 1/2 Tsp normal salt)
rosemary (optional)

Instructions

  • Preheat your oven to 200°C (395°F) and line a baking tray with a baking paper.
  • Wash your potatoes and cut slits into it, leaving the bottom intact, so that the slices stay connected at the bottom of the potatoes.
  • In a bowl mix togheter paprika powder, curcuma, olive oil and garlic salt.
  • Brush potatoes on the outside and between the slices with this marinade.
  • Put them onto your prepared baking tray and bake them for 30-40 mins depending on how crispy you want it.
  • 10 mins before baking time is over, sprinkle your rosmarin on the potatoes.
  • Enjoy!